About three years back Amazon started beta-testing a new author portal called Amazon Author (not to be confused with Author Central). That new portal officially launched this past week with a somewhat confusing name and a new address.
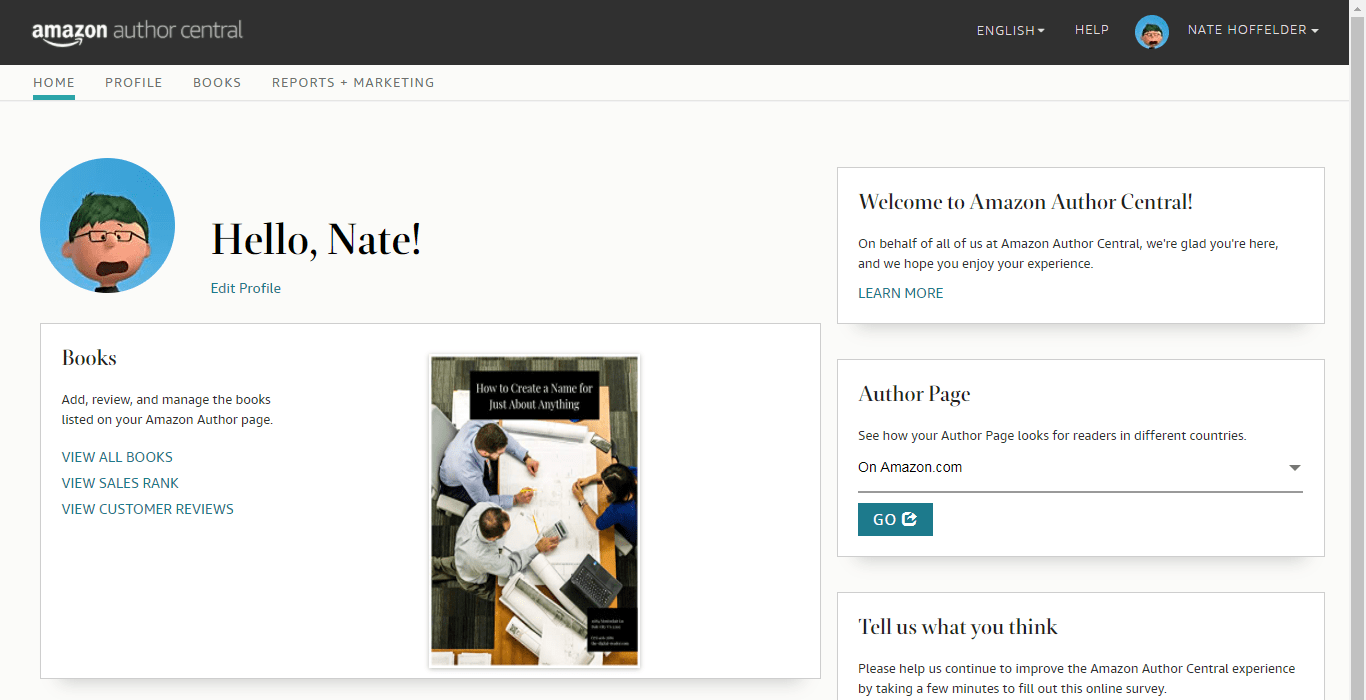
Amazon’s author portal used to be at authorcentral.amazon.com, but it has now been replaced by a new portal at author.amazon.com. Along with the new address, the portal has a new look and new features.
We’re excited to announce an upgrade to Amazon Author Central! With this update, we’ve made several key improvements:
You can now manage your Author Page, claim your books, and view your reports for multiple marketplaces from a single Author Central site with a single account.
An updated, modern look and feel makes it easier to search for titles, view your reports, and update your page.
Amazon Author Central is mobile friendly, and works well on a phone, a tablet, or a computer.
If you already have an Amazon Author Central account, you can sign into Amazon Author Central with it and start using it right away. If you don’t have an account but have published a book, sign up today!
One key difference between the new and old portals is that now you can manage your author profiles for all Amazon sites from this one portal. Before you had to login to a different portal for each country-specific Amazon site (Amazon.de, for example).
Speaking of which, the author portals on each of Amazon’s country-specific sites have also been updated with the new features, so if for example your preferred language is French, you can continue to use the French-language portal.
So what can you do with it?
For starters, you can upload language-specific bios, and you can also quickly check what your author profile looks like on each of Amazon’s sites.
BTW, if you have not uploaded the alternate bios yet, you should go do it now. I just noticed that my bio is only showing up on Amazon’s sites in English-language markets. (I had to re-upload a copy of my bio and tell Amazon it was in French in order to get the bio added to Amazon.fr, and I will have to repeat the process if I want to have my bio on other Amazon sites.)
You can no longer create a custom author page URL or list your public events, but you can claim all your books, and you can see customer reviews. Amazon will also tell you your books' current sales ranks, and they give you access to Bookscan (print book retail stats for the US market).
All of this is available from a clean and pleasant interface.
There’s a problem with how a lot of writers approach writing online; they focus on words.
This is a problem because modern web design is based on the idea that text is complimented by images. In fact, most current website themes are designed with the assumption that images will be used, so when someone publishes a post without images, it often feels wrong in some subtle way.
That is especially true with the upcoming v2.0 release of my Author Website in a Box project. The new release is going to include a design for blog posts which will make them look gorgeous – if you use a featured image with each post. If you don’t, the posts will look vaguely off.
Since I know I will be making this an issue for users, I decided to go ahead and explain how to find and use images in a blog post.
Generally speaking, there are three things you need to know about this topic:
where to find the images
how to choose one
where to put it in the blog post
I already covered the first point in detail in another blog post, so I won’t repeat myself here. Instead, let’s start with choosing images.
How to Choose
The trick to using images with your blog posts is to find an image that says something about your post or its topic.
If you’ve never done this before, that might not be very useful, so let me put it a different way. Ask yourself the following questions about your blog post, and then use your answer to search for images.
What is your topic?
What is the subject of your post?
Is your post connected to a specific place, profession, industry, or what have you?
What is your opinion on the subject of your post?
What emotion or sense do you want to convey with the blog post?
There are more questions you could ask; these are just the ones I use when I go looking for images for my blog post. I have in fact been writing about the same topics for so long that I am having trouble coming up with questions for you, but I am sure there are more.
The thing about the image sites I linked to in my other post is that most have search functions that will try to match your search term with all of the tags attached to each image. Some will even try to match your search term with their AI’s guess about the content in each image. (This is still hit or miss, but the hits are getting better.)
If you can think of words to describe your blog post, chances are you will be able to use those words, to find images.
I have some advice on how you should choose them:
Before you choose an image, take a few minutes to consider the message it might convey unintentionally. For example, a few years back I wrote a post about Amazon hiring Dutch and Russian translators, and illustrated it with a photo of The Hague. This was shortly after Russia invaded the Crimea, an otherwise a completely unrelated event to my post which still managed to turn that photo into a comment on geopolitics.
When you are about to download the images, most image sites will offer multiple size options. Be sure to choose an image at least 1500 pixels wide. This will give you more pixels than you need, yes, but that is better than choosing an image which is too small.
Also, you should consider what the image will look like on FB and Twitter.
Where It Goes
Once you have found the image you want to use, you need to decide how and where to use it.
Actually, the first thing you should do is provide an image credit link when required. Almost all of the photos I use on Flickr are licensed under Creative Commons terms that require crediting the creator, which is why you usually see an image credit line at the end of my posts.
Once you have added that image credit, it’s time for you to add the image to the post.
The very first place you should use an image is as a "featured image". This is a special type of image which is not inserted or embedded in the post so much as it is "attached".
Do you know how a lot of blogs have a large image either right before or right after a blog post title? That is an example of a featured image. It was placed there automatically by the the website after said image was selected by the blogger.
So how do you set an image as a featured image?
Well, that varies between blog themes, but most sites will have a spot in the right-side menu column of the "edit post" menu that specifically says featured image. It should say something like "Set featured image" and if you click it you will be taken to a menu where you can either choose or upload an image.
If you want to just use the one image on your site, that is great. Go ahead and set that as the featured image, and you are golden.
But if you want to use several images, I have additional advice.
Be sure to only use images that stretch the full width of the post column, and not half, three-quarters, or one-quarter the width of the text. I make this suggestion because those partial-width images do not look good on smartphones or in your RSS feed. (It took me about 8 years to notice that detail.)
I also think you should use images sparingly, and that you should avoid making the post heavy on images and low on text. If, for example, you need four images to illustrate a point, combine them into a gallery.
One good way to use images is as section breaks, or to illustrate the key points in your post.
When I launched my Author Website in a Box project last June, one of the first questions that came across my inbox was how to build a bookstore on the AWinaBox site. My answer at the time was to recommend using a third-party service such as Payhip to handle payment processing and ebook delivery.
That was sound advice, albeit lacking in detail, but I knew I can do better.
When I launch AWinaBox 2.0, my answer will be to tell authors to use the template that will come bundled with the project. That launch is still a couple months away, so in the mean time I thought it might be useful to lay out the basic steps for setting up that bookstore so that everyone could use the info.
Update: It occurred to me after I published this post that "selling an author’s ebooks" and "having a bookstore" are two very different things. This post is about an author selling their own books. If you want to set up a bookstore, look into Aer.io.
I am just going to lay out the broad strokes here, and later come back and add the finer details.
The following project is moderately difficult and requires a modicum of skill, but if you can build a page on your and you can embed a FB Pixel, you can sell an author’s ebooks set up a bookstore on an author website.
What it comes down to is that you should use the buttons and code from a service such as Payhip, and embed them on your author website.
The first step is to set up an account at Payhip.
Payhip
Payhip is not the only company that will handle payments and content delivery, but their platform is relatively easy to learn, they’re not too expensive, and they cover all the basics. If you’ve never done this before, Payhip is a good place to start.
Set up your account, including your payment info.
Create a listing for each title you want to sell. Upload the cover, title, blurb, and the relevant ebook files. At a minimum you should upload Epub and Kindle, and possibly PDF.
Proof all of your listings to make sure there are no errors.
Be sure to save the cover and the blurbs because you will (might?) need them later when you add the buy buttons build the bookstore on your site.
Oh, and BTW, I feel I should point out that you can sell ebooks by sending people to Payhip to buy them. I do not think that’s a good idea; IMO the Payhip pages have a terrible design which hurt my eyes, and I don’t think that they sell very many ebooks.
Instead, I think you should sell ebooks on your author website itself using the buy buttons and other code provided by Payhip.
Here’s how you will make that happen.
Your Site
Before I tell you to build anything, I should probably point out that if you have a page with all your books in rows, you can add the Payhip buy buttons to the existing page (and save yourself a lot of work).
Also, if you have each of your books on its own page, you could also add the Payhip buy buttons to each book’s page. This is not my preference, however; I want all the books on one page.
If you don’t have those pages, here’s how you set up a bookstore page to sell an author’s ebooks.
Start by creating a new page on your site. Give it the name of "My Bookstore", and add a subtitle which gently reminds visitors that you make more money when they buy direct.
Below that you will need to make a row for each of your books. You’ll need to add the cover, the book blurb, and buy buttons so that they look something like this:
That first button is going to be the Payhip button (it uses Payhip’s code), and the other buttons lead to other retailers.
BTW, you do not have to use buttons (I just have a preference for them). In fact, it might be easier for you to instead use text links. I am finding that getting all the buttons to play nice requires finicky CSS, where text links are much less complicated.
In any case, you will need to add a row for each book to the bookstore page. You’ll need to make sure the covers match the blurbs, and that the buttons link to the right retail pages.
A newly launched WordPress plugin has presented me with an opportunity to mount a soapbox and recommend better work habits.
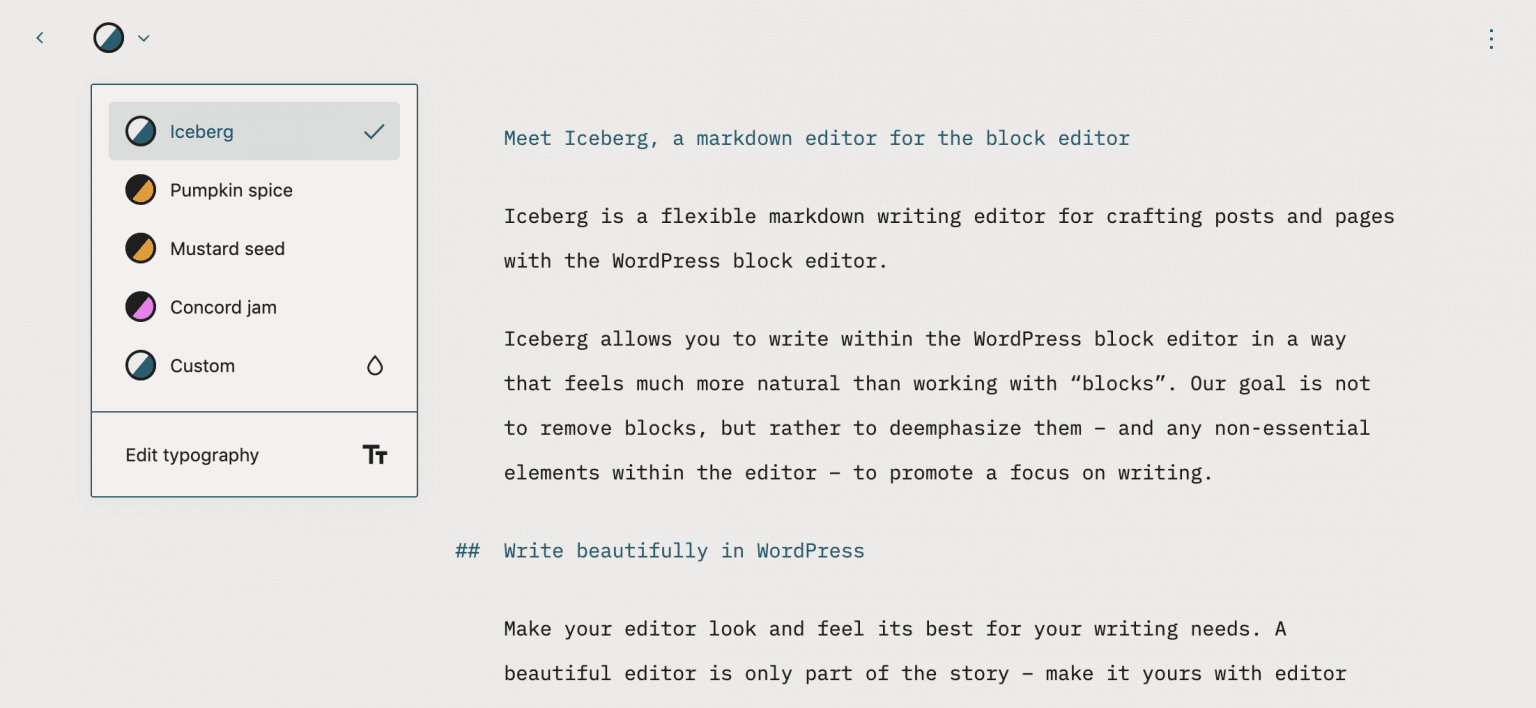
I was just reading about a plugin that removed distractions while writing in WordPress. Writers are constantly searching for ways to remove distractions while they are writing, and while Iceberg sounds like a really useful plugin, you should not use it with your WordPress site (and not just because it costs $49).
The thing is, you should not be doing original writing in your WordPress site. Instead, you should write and edit elsewhere, and then copy the text to your site so it can be laid out and published.
Iceberg features a minimalist editor with four color themes, the ability to create a custom theme, and a set of typography controls. In switching to Iceberg, there is not much missing much from the default block editor that would be necessary for writing. Users can drag and drop media into Iceberg and the backslash command works to trigger the block inserter. It also includes a Table of Contents, word and character counts, reading time, keyboard shortcuts, and support for emoji.
While this plugin sounds interesting, I think anyone who wants a distraction free writing app should look for one that is separate from their WordPress website.
The thing is, if you get in the habit of doing your original writing in WordPress, you will get out of the habit of creating an independent backup of your work. This means that if your website crashes and has to be restored from a backup, you might lose your work.
This happened to me recently, and while I did recover my work, this painful experience has taught me that I should really be writing posts elsewhere, and then copying the text to my blog for publication.
Sunday, 16 February 2020, was the day that I became a real author.
I have been a writer for over a decade now, but Sunday was the day that I learned that one of the workbooks I had uploaded to KDP had been pirated and was being sold on a pirate site.
I didn’t really care that it had been pirated; my blog posts have been pirated so many times that I have grown a thick skin. Furthermore, the workbook was a lead magnet I had uploaded so I could learn how KDP worked.
But since I was filing DMCA notices Sunday night; I thought this would be a good opportunity to share my process and explain the most effective way to deal with piracy.
For starters, the primary way you fight piracy is by filing a DMCA takedown notice.
A DMCA notice was originally named for a provision in the Digital Millennium Copyright Act which required tech companies in the US to remove online content when they were informed that the content infringed on a trademark or copyright.
Since then it has become a common term on the internet. Most web companies will respond to a DMCA notice, including companies in countries not covered by the DMCA. They do so more because it’s SOP in the industry than because they have a legal obligation to do so (depending on where they are based, they might not have any law that requires compliance).
But where to send the DMCA Notice?
Well, that will depend on where you found the pirated ebook.
You might find the pirated ebook in an ebookstore, or in a cloud storage service, or on a pirate site, and each requires a different approach.
Did you find the pirated ebook in a legitimate ebookstore like Play Books, the Kindle Store, etc?
If that is the case, then you need to file a takedown notice with the retailer. Here are the relevant pages for the larger ebook retailers.
Be sure to fill out the form for each pirated ebook you find. Be thorough, and precise. Many of these companies get millions of notices a day, and if they can deal with your notice by rejecting it because you missed something, they will.
TIP: If you don’t see the name of the company you need to contact, you can find their contact info by googling their name plus "DMCA". If that doesn’t work, try their name plus "copyright".
Did you find the pirated ebook on the Internet Archive, The Open Library, or the National Emergency Library?
The Internet Archive has not posted any instructions on how to file a DMCA notice in The Open Library or the IA’s main site because they do not accept DMCA notices for those sites, but they have posted the following instructions for getting your pirated ebook removed from the National Emergency Library:
Authors who do not want their books in the National Emergency Library should send an email to [email protected] with “National Emergency Library Removal Request” as the subject line. Please include each URL of the book or books you would like to have removed. Please allow up to 72 hours for processing as we are a small team.
Did you find the pirated ebook on a legit file-sharing site or cloud storage service?
If that is the case, then you need to file a DMCA notice with the service that is hosting the file. Here are the submission pages for the major cloud services:
Again, if you don’t see the name of the company you need to contact, you can find their contact info by googling their name plus "DMCA". If that doesn’t work, try their name plus "copyright".
Was the pirated ebook on some obscure site?
This is where things get complicated.
My rule of thumb is to only send takedown notices to companies that I can trust will respond. This is why I will send a notice to, say, Google, but not a pirate site like the late eBookBike.
I do not bother sending notices to pirate sites because they rarely respond. In the ten years I have been a blogger, I have found they often ignore DMCA notices because they know they can get away with it. A lot of the time they are in a different legal jurisdiction, making it difficult to pursue legal action, and even if you did have the tens of thousands of dollars it would take to sue them, you will be throwing your money away for little benefit. The pirates know this, which is why many pirate sites will simply ignore you.
Also, a lot of pirate sites are only pretending to have your book. This type of site is usually running some kind of con (it varies). Since this type of site doesn’t have your ebook, it’s not worth your time even talking to them. What you should do instead is file a DMCA notice with Google. Ask Google to remove from its search results any pages on the faux pirate site that mention your book. You can do that here.
So how do you send a DMCA notice to a hosting company when you don’t know their name?
This is going to require a little investigative work.
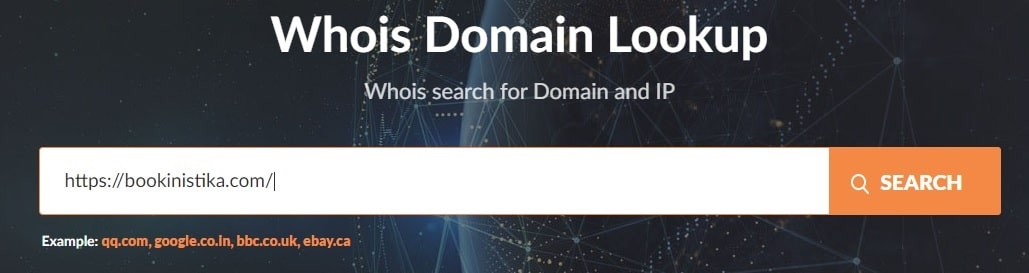
The first thing you should do is open a new browser tab, go to www.whois.com/whois/, and enter the pirate site’s domain.
With most sites this will give you a page full of technical and contact info about the site.
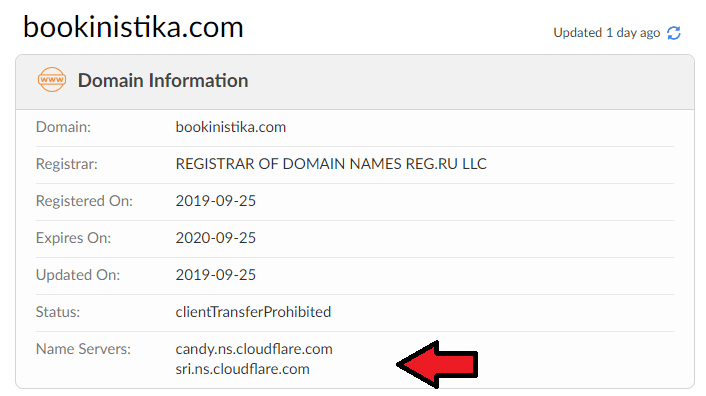
The section you need to look for is the "nameservers". This can contain anywhere between one and 4 entries, and the reason we are looking at it is because the entries will give us a clue about the hosting company.
For example, the site that pirated my ebook uses Cloudflare’s nameservers.
To be clear, this pirate site is not hosted by Cloudflare (it’s just using CF’s services). This detail is not strictly relevant, however; what matters is that I can send a DMCA notice to Cloudflare.
I do not know where to send the notices, exactly, so what I do is google Cloudflare and DMCA. This often turns up a good result, so you might want to try a similar trick if you are in my position.
This trick does not always work, however. Some hosting companies use obscure names for their nameservers, and when I encounter that I either have to ask for help in a forum for web techs, or spend a few minutes looking up obscure technical info. If you need a place to ask fro help, may I suggest one of theWordpress or web developer groups on Facebook. Also, if you ask me I will be happy to help you figure out the answer (this is fun for me).
But most of the time googling for the hosting company’s DMCA page will give me a link to the page, and what I do next is fill out the form on that page.
Again, be sure to fill out the form for each pirated ebook you find. Be thorough, and precise. Many of these hosting companies get millions of notices a day, and if they can deal with your notice by rejecting it because you missed something, they will.
What’s next?
After you have sent the DMCA notices, you’re going to need to follow up. You will need to be persistent in making sure that each notice is complied with, and that each pirated ebook is removed.
A couple years ago I had a problem with a pirate scraping my blog. I ended up having to send dozens of DMCA notices, and I had to repeatedly follow up because the hosting company, LeaseWeb, kept falling for the pirate site’s lies when it claimed to have removed the pirated blog posts.
What was particularly frustrating about that incident was that I had to file DMCA notices with three different divisions of the company in three different countries. Then I had to yell at the three different divisions to get them to follow through.
That was frustrating, but I did finally manage to put an end to that particular piracy issue.
Addendum
If this seems like too much work, here’s a list of companies that can fight piracy for you – if you pay them enough.
BTW, you might also want to consider engaging Heather Cassaday. She’s a virtual assistant who works with authors, and this is one of the services she offers. (She tipped me to my ebook being pirated.)
So as you may know, my mother is on my Amazon account. (There is a point to this anecdote, trust me.) We mainly use it to read ebooks; I sideload SF ebooks while she reads free romance novels.
This worked out well for us (since long before Amazon had any sharing options) because our reading interests didn’t intersect, and because I could use Amazon’s system to email tech docs from her job to her fire tablet. Or at least this did work out well until yesterday, when I got an email from Goodreads, congratulating me for finishing a romance novel.
It seems that when I set up my mother’s new Fire tablet, Amazon automatically re-connected my Goodreads account with my Kindle account. I had set the accounts so that my Kindle reading activity would not be uploaded to my Goodreads account, but Amazon overrode my wishes, and now my Goodreads account public profile says I am currently reading four romance novels and have finished another two.
I have since disconnected my Goodreads and Kindle accounts, but I was inspired today to write about default Amazon security settings that authors should change to protect their privacy.
Update: In light of revelations that Amazon shares your Alexa utterances with contractors, I have expanded this post with a 7th suggestion.
Update (12 February 2020): I just added instructions on how to stop Amazon from tracking what you are doing on Kindles and Kindle Fires (don’t worry, this will not affect your reading activity).
Let’s start with Goodreads.
1. Disconnect your Kindle & Goodreads accounts
An author who writes children’s books probably doesn’t want the non-child-friendly novels they’re reading showing up on their Goodreads profile. Goodreads doesn’t have many account level privacy options, so really the only way to solve this is to separate your Goodreads account from your Kindle account.
Note: If you use your Amazon account to log in to Goodreads then you will first need to set up new login credentials, otherwise your Goodreads will be deleted.
I just changed this setting on my mother’s Fire tablet by going in to the settings menu, opening the accounts menu, and selecting the social networks option. I was presented with options for Facebook, Twitter, and Goodreads, and I made sure to disconnect all three.
Note: I could not find any similar setting in my accounts on the Amazon website or the Goodreads website; while the setting might be there I could only find it on the Fire tablet.
Once that is done, let’s do something about Amazon tracking your web browsing.
2. Clear Amazon tracking cookies
When you first visit Amazon’s website, the retailer installs a cookie on your device. As you navigate around the site, that cookie reports your activity back to Amazon.
Here’s how you can stop that from happening.
Visit Amazon.com, and select the "browsing history" option from the menu bar.
Select the "manage history" option on the right, and then when the new menu options, click the toggle button to disable tracking. Also, click the "remove all items" button, to clear your history.
That will stop Amazon from tracking your browsing on its site. It won’t stop Amazon from tracking your other activity – if you have an Echo, for example, Amazon records everything you say to it.
3. Delete your Alexa recordings
If you have been following smart speakers in the news then you probably know that they listen to everything. What you might not know is that Amazon records everything you say to Alexa and stores an audio recording of every voice command you’ve issued, not just in the device itself, but on Amazon’s servers.
You can play back all of the recordings in the history menu on Alexa.amazon.com, and if you like you can delete the recordings one by one. But if you want to delete all of the recordings, the best way to do that is to visit the "Manage your content and devices" page on Amazon.com. Any Alexa apps you have registered, as well as the Echo smart speakers, will be listed on this page.
You can select each one, and delete the recordings associated with the app or device. If you use Alexa on a Fire tablet, you can also delete those recordings from this page.
I just deleted the recordings related to my Echo Dot. The confirmation said that my request was received, not that the files were deleted. There’s no way for us to tell that Amazon actually followed through, unfortunately, so we’ll just have to take their word it.
And while I was at it, I disabled the option to order from Amazon using Alexa.
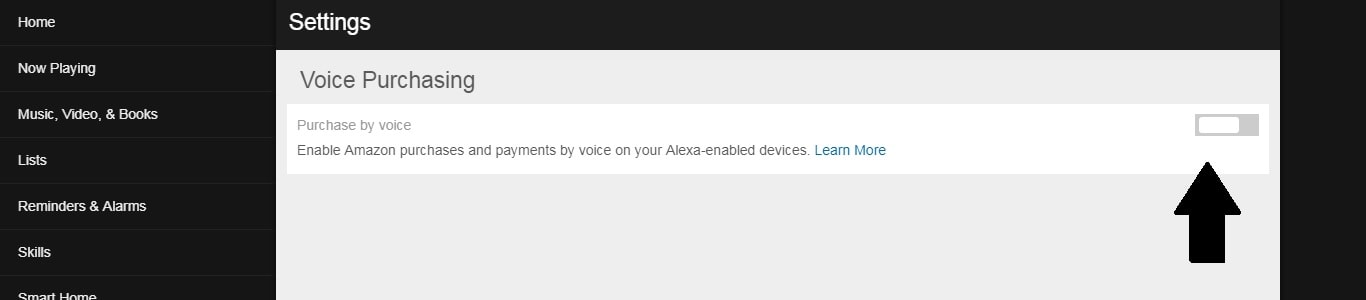
4. Disable Alexa’s voice purchasing feature
I have heard far too many stories about pet parrots or small children using Alexa to place orders at Amazon, and that is why once I decided to take steps to enhance my privacy I made sure to go in and disable this feature.
You can disable this feature by going to the relevant settings menu on Alexa.Amazon.com, and clicking on the toggle button to turn it off.
Okay, so this technically is not a privacy setting, but disabling this feature is still a good idea.
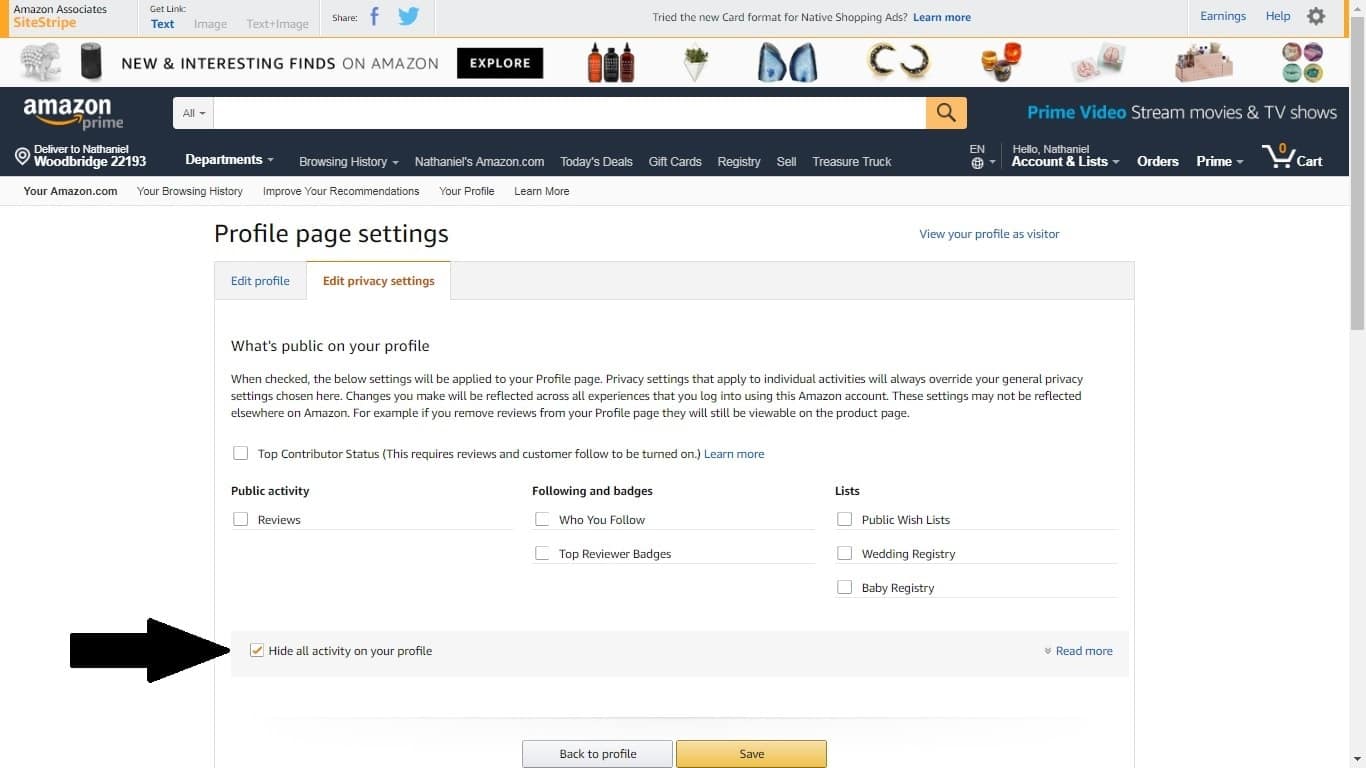
5. Remove your public Amazon profile
Even though you might never have rated a product or posted a review, Amazon automatically created a public profile for you that lists a lot of what I would describe as personal and private info. This won’t include your buying history, but it does include any biographical information you’ve provided as well as your comments, ratings, the authors you follow on Amazon, your public wish lists, and other interaction with Amazon.
You can control what Amazon reveals about you by going to your account page on Amazon.com, scrolling down to the "Ordering and shopping preferences" section, and selecting the "profile" option
This will bring up a new menu showing your public profile. If you select the edit option near the top of the screen, you will be taken to a menu where you can edit the content on your profile and its privacy settings.
I decided to hide everything from my profile, but you also have the option of being more selective.
On a related note, I also decided to hid my shopping and wish lists.
6. Make your wish lists private
When you created your last Amazon Shopping List, did you check the privacy settings?
Those lists have a default setting of public, which is great if you want to share them but not so great if your shopping list is filled with sex toys.
If you’re not sure about the privacy settings of your Amazon Lists, go to Amazon.com, click on the Accounts & List drop-down menu, and then select either "Shopping List" or "Wish List." This will bring up the "Your Lists" page. If you look on the left side of the screen you will see a list of your lists and their privacy levels.
If you see a public list that should be private, select the list and then click the 3-dot menu icon and then select the "Manage List" option.
This will bring up a menu where you can change the privacy status and other details.
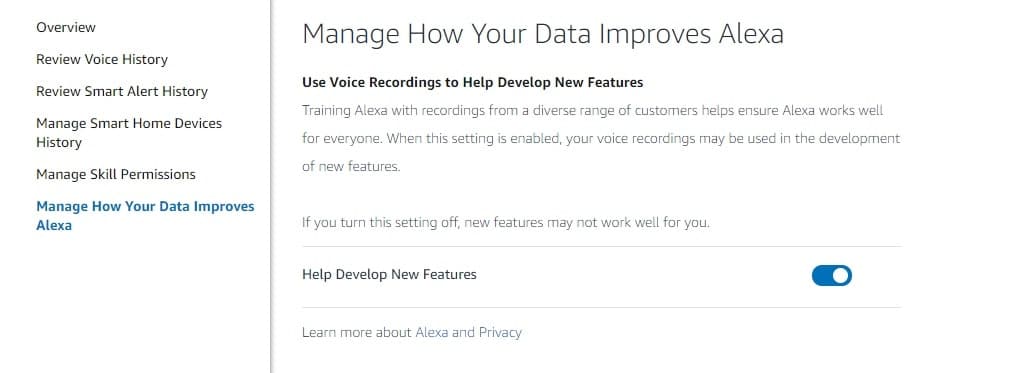
7. Stop Amazon from sharing what you say to Alexa with contractors
Amazon has admitted to not only recording what you say to Alexa but also sharing those recordings with contractors. If you’re reading this post then I am sure you will want to stop Amazon from sharing your info, and here’s how you can do that.
Visit the Manage my Content & Devices page on Amazon, and select the option of Alexa privacy. Then, on the Alexa privacy page, Scroll down to the section labeled "Manage How Your Data Improves Alexa". Click the arrow.
On the next page you will see a blue toggle next to a label that reads "Help Develop New Features". Click the blue toggle to disable this feature and enhance your privacy. You may also see one or more blue toggles in a section labeled Use Messages to Improve Transcriptions. Uncheck those blue toggles as well.
It’s not clear that this will stop Amazon from sharing your recordings, however. According to Bloomberg, Amazon said "people who opt out of that program might still have their recordings analyzed by hand over the regular course of the review process".
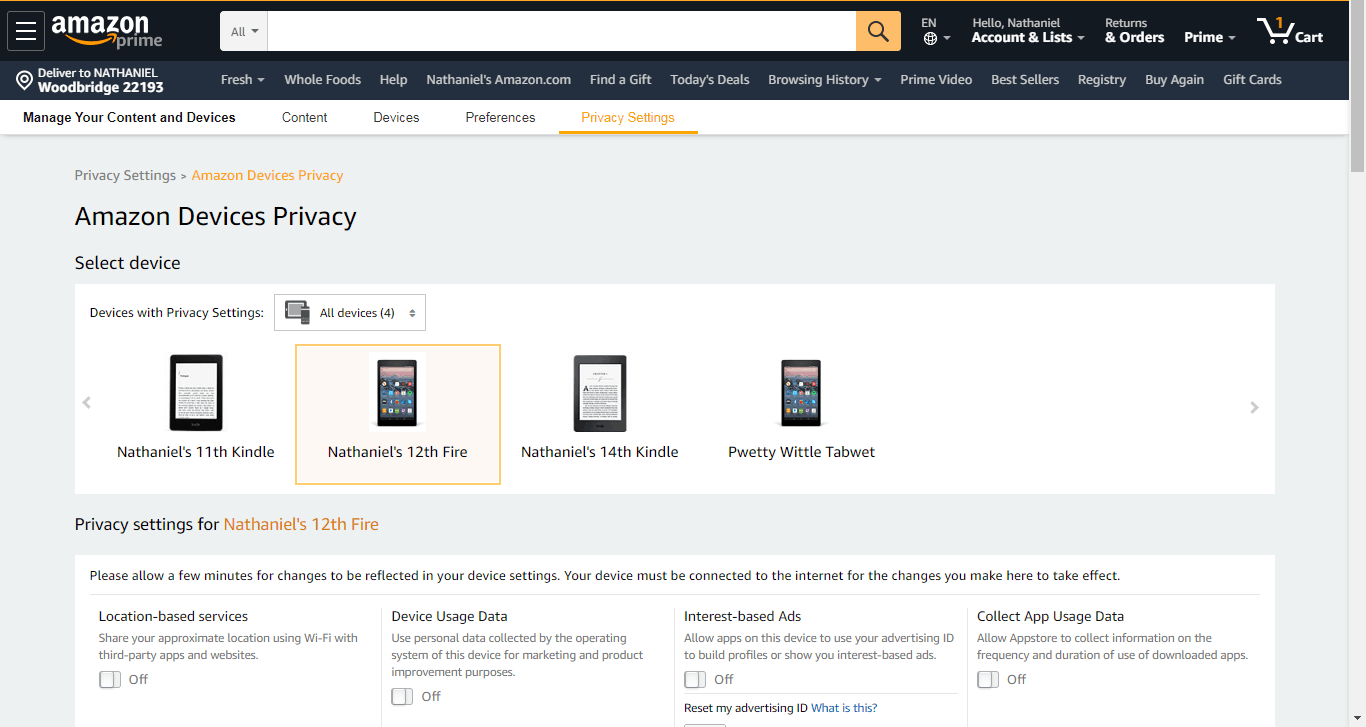
8. Disable Tracking on Your Kindle Fire or Kindle
This slipped my attention when I first wrote this post, but Amazon tracks everything you do on your Kindle ereaders and Kindle Fire Android tablets. You can disable this tracking on devices that run the latest version of the firmware, but not Kindle apps or older devices. This means that at least two-thirds of users cannot take advantage of this option, but some will be able to.
Here’s how.
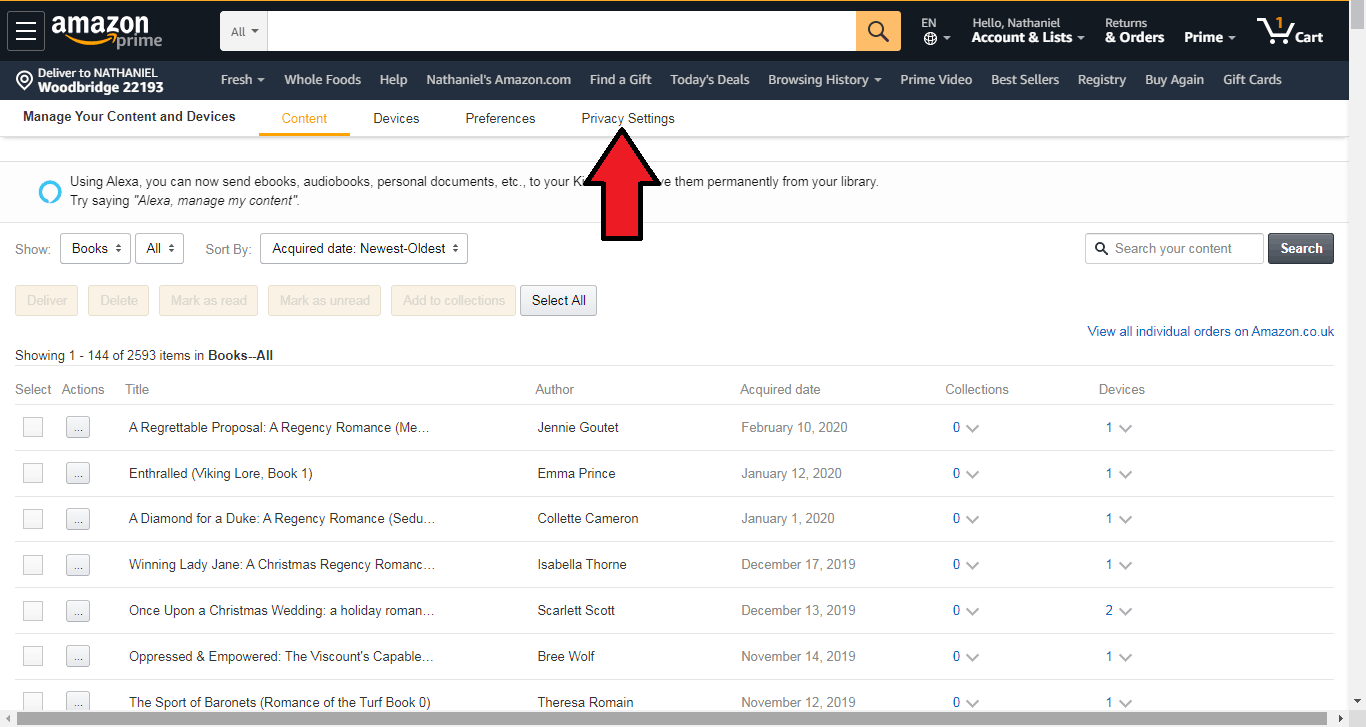
Go to Amazon.com, click on the Accounts & List drop-down menu, and then select "Manage Your Content & Devices". This will take you to the page where you can manage your devices, apps, and the content on them.
When you are in the MYC&D menu, select the option for "Privacy Settings".
In the next menu, click the "Manage Settings" button under Amazon Devices Privacy. This will take you to the menu you can manage the privacy settings for each applicable device.
You will need to select the devices one by one, and disable each type of tracking one click at a time.
You might find that some of your devices are listed here but do not have any settings you can change. Those are the devices that need to be updated before you can manage the device’s privacy settings.
And of course, any devices not listed are going to be running software so old that you can’t stop Amazon from tracking what you are doing. (You also can’t stop Amazon from tracking what you are doing in the Kindle and Audible apps.)
Book fairs and other local events can be a great way for authors to connect with readers and make new fans. They are immensely valuable, but at the same time it can be hard for first-timers to get the most out of an event.
That was certainly true for me. I didn’t used to exhibit much (meeting new people is stressful) but lately I have been working to overcome my limitations. Over the past few months I have been exhibiting more and more, learning as I go, and I have picked up a few tips I would like to share with you so that you can benefit from my experiences.
The following post is a mix of mistakes I made at my first trade shows and tips inspired by my time as a volunteer at the Fredericksburg Independent Book Festival on Saturday.
Update: I added to this list in April, May, and November 2019. Now that I have a few more cons and festivals under my belt, I can see more ways to improve.
If you have tips you learned the hard way, I would love to read them in the comments.
Plan in Advance
It’s taken me longer to figure this one out than I would care to admit, but if you invest time in planning your activities at an event, it will pay off in spades.
And when I say you should plan your activities, I don’t just mean write out a schedule or make a list of what you need to bring. What I now do is write what are essentially business process documents that lay out every step of every activity. I have a doc for networking, and another one for being an exhibitor. I have a doc for doing a presentation, and another for media interviews.
Bring a Camera
This one is on me.
I realized, about ten minutes after I started talking to authors on Saturday, that I had neglected to bring any way to document my day. I had left my camera at home, and forgot to charge my smartphone that morning.
Don’t make my mistake; bring your smartphone so you can show your fans what you’re doing.
While I am rather camera shy myself, I also know that as a fan I follow the activities of my favorite authors. Fans are interested in this kind of personal detail, and you will make them happy when you share it.
In fact, your fans will want to meet you in person.
Chocolate
After exhibiting at five events I can confirm what we had all suspected for years: Chocolate is the one sure-fire way to get people to approach your booth.
If you spend ten dollars to buy a large mixed bag of chocolate, you will make dozens of new acquaintances (you will also have something on hand to keep your blood sugar up). Just make sure that you put the chocolate in an attractive bowl, and periodically refresh it throughout the day.
BTW, if you forget to bring chocolate, and your event is located in a hotel, check to see if there are any mints or other candies set out for attendees. You can put those in a bowl on your table, and achieve almost the same effect as chocolate.
Signs
You are only one person, and you can only carry on one conversation at a time. (Even if you have several people staffing your table, the same limitations apply.) One way to make up for this limitation is to have several inviting signs ranging from a banner hanging behind your table to smaller 8.5 x 11 signs sitting on your table.
Just remember, these are signs, not hand outs, so be sure to keep the content simple. I limit each sign to just one headline for a single topic, and I phrase the headline like a directive: "Sign up for my mailing list", for example, or "Enter a raffle for a free X!", or "Ask me about my free service Y".
There are many options, and 8.5 x 11 signs can be printed at home, so there’s no reason not to try several ideas until you find the ones that work the best.
Schedule
That’s why you should tell your fans about your events in advance so they can meet you at the event. In the weeks leading up to your first event, be sure to announce both on social media and via your newsletter that you are going to be at a book fair, show, etc.
You might even want to set up an event schedule on your author site so your fans can plan ahead and make sure they have room in their schedules.
Mailing List
All the authors I met at yesterday’s book fair brought books to sell, and they all came prepared to talk about their books, careers, and other topics, but do you know what I would have done?
I would have found a way to continue the conversation after the event. To wit, I would have brought a tablet so I could let attendees sign up for my mailing list. (Coincidentally, this is something I only thought of after my first trade show.)
Trust me, if attendees like the genre of books you write, they will want to sign up for your mailing list. There were five or six authors at Saturday’s event that I wanted to connect with later. I would have signed up for their mailing lists if they had offered the option. Instead, I had to type their names into my smartphone.
Flyers
Do you know what would also be a good way to continue the conversation after the show?
Bring flyers that you can give to attendees. Seriously, it is SOP in almost every industry that exhibitors have flyers to hand out to attendees. This is one of the better ways to get an attendee more info so they can decide whether to follow up later.
Authors can adapt this practice by having 4” by 6” flyers printed either at a local print shop or online. The flyers can talk about an author’s latest book, the main characters, or the series. You can even have more than one flyer printed, tailoring each one to a specific topic.
On the other hand, flyers are rather expensive ($0.50 to $1 each) compared to the price of most indie-published ebooks, so authors should probably run a cost-benefit analysis first to see whether the flyers are worth the investment.
Flyers, redux
Here’s something I had to learn the hard way: If you’re going to talk about a product (not your activities, but something that has a specific name) then it would really help to have a flyer to give out to those who are interested.
Canopy
The usual advice on prepping for an event is to do a dry run. Set up your table, make sure all the signs can stand up on their own, and that your displays do not look cluttered.
That is all great advice, but based on what I saw on Saturday I think that when prepping for an event authors should make sure that they also go out in their backyard and set up the canopy they are going to bring to the book fair.
The standard collapsible canopy is really easy to set up once you know how, and all it takes is watching one Youtube video and setting it up one time in your backyard to learn details like there are four specific spots where velcro on the canopy’s cloth attaches to velcro on the metal frame (attach the velcro and the cloth will be lined up correctly). Also, you can tell the frame is properly assembled when the bracing “clicks” into place.
I helped set up a couple dozen canopies on Saturday, and I can tell you that a little bit of prep time can mean the difference between getting the canopy set up in 90 seconds and struggling with it for half an hour (my first one took me half an hour to set up, yes).
As a rule, you should put a similar amount of time into setting up your displays in advance, but in my experience the canopy was the one thing that authors needed help with the most.
Swag
Sure, bring books to sell, but don’t stop there. An attendee might not want to buy your books (some of us prefer ebooks) but they might be interested in buying merchandise related to your books.
Remember, one of your goals is to break even or turn a profit from today’s sales, so if you can offer posters, collectibles, bookmarks, or something else that might interest an attendee, and it’s related to your books, you should seriously consider selling it at your table.
eBooks
I for one would really like to buy ebooks from the authors I meet at cons, but very few authors are equipped to sell them. Here’s a post that will give you more info on how to sell ebooks at an event.
***
Here are a few of the things I learned the hard way; how about you?
For the past couple weeks I have been working on a new project, and I think it’s gotten to the point where it’s ready for public testing and feedback.
The project has the working title of "Author Website in a Box", and it is intended to provide a complete author website based on WordPress.
The site has everything from a home page to a contact page, about the author page, and even bookshelf pages. I even included dummy content that you can replace, and I installed SEO, security, backup, and other essential plugins.
Yoast (an SEO plugin – it helps readers find you in search engines)
Novelist (a bookshelf plugin that makes it easy to display your books)
All in One WP Security (a firewall plugin that keeps hackers out)
Contact Form 7 (the best free contact form plugin)
Mailmunch (a great plugin for integrating your mailing list into your site)
The site has a good general design which can be improved upon or customized with a little work. It is built using SiteOrigin’s pagebuilder, my preferred tool for building author websites. Almost everyone I know agrees that while it is not the best tool available, it is relatively easy to learn. It’s also free, which means I can include a copy for you to use with this site.
I have a version of the site myself (this is what I use to develop the site for you to download) which you can see here: dummy.authorwebsiteinabox.com.
Before I tell you how to install it, I have a few words of warning.
Caveats
This project currently requires a fair amount of technical skill to install. You’ll need at least some experience with WordPress, or be comfortable with installing and configuring unfamiliar software.
Installing AWinaB will erase the existing site. Whatever you have there will be gone forever , so be sure to remember to make a backup first (or better yet, only install this on a fresh WP site).
All AWinaB-based sites come with the same username and password for the admin account. You will need to change the password right away so that strangers won’t be able to log in to your site. (I also gave myself an admin account, but that is intended strictly for emergencies.)
Third, go to the "All-in-One WP Migration" menu page on your site, select its import menu, and choose the option to import the the site package you downloaded.
Fourth, when the import process succeeds (this may take a few attempts), you should look at all the pages on your site and compare them to the site I built. If there are any significant differences then there might be a problem (please bring them to my attention).
And that is essentially the entire install process. Your next step is to change the content, add your books, connect your mailing list, but before you can do that you will need to log in using this username and password. Please, for everyone’s sake, change the password right away.
password: UjHWErnWE47qUxLPV0e8
username: new admin
What’s next
If and when you install the site package, I would really appreciate any feedback you can give me. For example:
If you can’t successfully install the site package, let me know. I’d like to figure out why you had trouble so I can make sure no one else has the same issue.
If you think the site is missing pages or features, please tell me what you would like me to add.
If you know of another tool/process for installing the site package that makes it easier to install, I absolutely want to hear about it.
Please do send me your thoughts, requests, or suggestions: [email protected]
And of course, if you need help with installation or setup, you can hire me. I can also help you run the site, and I can even host it for you.
I did not start this project to make money; I wanted to give authors a useful tool, and my long term goal is to make AWinaB as easy to use as possible. But not everyone has the same abilities, goals, or skill level, and I am here to help anyone who needs it.
Google Docs is a popular word-processing tool that lets you access your documents and files from any internet-connected device. I for one have found it to be immensely useful as an editing tool; I like to review a Doc on my iPad, and then make changes on my laptop before sending the updated Doc to my collaborators.
Google Docs makes it easy to work with people both near and far, but do you know how to use it to its full capacity?
Go beyond just editing a doc and leaving comments with these 14 Google Doc hacks and add-ons.
Translate a Doc
Google Translate is one of the more useful features in Chrome, but few people know that Google Docs has the same integration.
If you frequently work with documents in another language, you can translate the docs into English or another language by selecting the Translate Document option in the Tools menu.
The translation is handled by GTranslate, so it’s going to be far from perfect, but if you need to translate a multi-page PDF this is still a better option than opening the PDF in Chrome and translating it there.
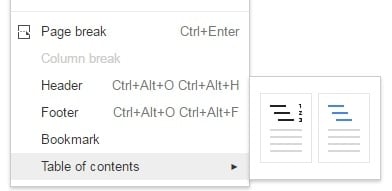
Insert a Table of Contents
If your doc gets long enough you will need a tablet of contents. Google Docs can make one for you almost automatically. Simply choose where you want it to go and Google Docs will automatically create the TOC based on the headings in the doc.
You can find the table of contents option at the bottom of the Insert menu.
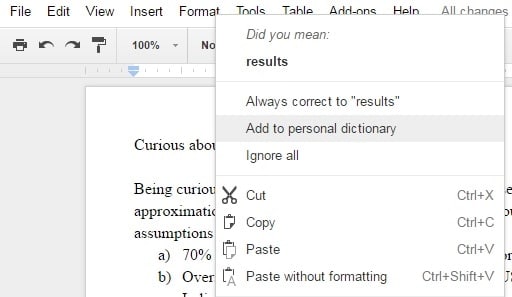
Add words to your Dictionary
Is there a word that you use all the time that isn’t found in the standard dictionaries?
Why not add it to your own. like many word processing apps, Google Docs lets you assemble a custom dictionary. simply right-click on the word and then choose the relevant option from the pop-up menu.
You can also tell Google Docs to automatically fix the words you frequently get wrong. I, for example, misspell "believe" all the time.
Go to next/previous Typo
Google Docs makes it easy for you to quickly correct your errors. There are a couple keyboard shortcuts which let you jump from one typo to the next.
To find the next typo in your doc, press Ctrl + ‘ (apostrophe). And if you want to find typos earlier in the doc, press Ctrl + ;.
Google Docs also has a spellcheck feature that allows you to quickly skim through the spelling errors in a current document. Just select the Spell Check option in the Tools menu to use it.
Export as Epub
Not only can you edit a doc in Google Docs, you can even export it as an Epub ebook. You won’t be able to edit it after you export the file, but that’s okay because you can always export another copy of the doc after you’re done editing it.
You can find the export option under the File menu. Check out the Help Center for more information.
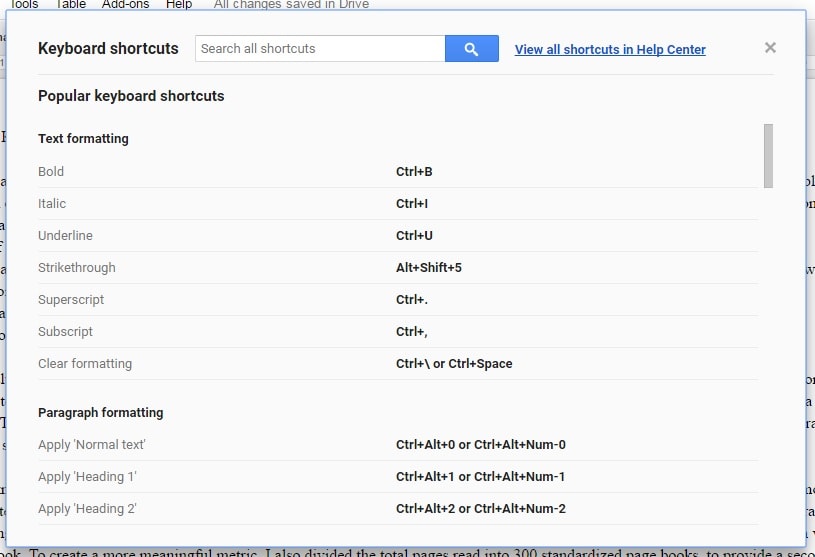
List Keyboard Shortcuts
Keyboard shortcuts are a productivity hack that is guaranteed to boost your typing speed. Almost all word processing apps have them, but who can keep track of them all?
I know I can’t, and that’s why I made sure to memorize the shortcut which brings up a list of all the keyboard shortcuts in Google Docs: Ctrl+/.
Create custom Shortcuts
If you have some special symbol you use all the time, Google Docs has a way for you to enter the symbol without cutting-pasting it and without entering the HTML/ASCII code every time.
The Preferences menu gives you the option to set your own shortcuts. These aren’t shortcuts that let you execute actions or change settings but are instead shortcuts that swap out one piece of text with another.
We all make mistakes sometimes, and Google Docs has us covered. It keeps a record of the changes you make to a doc, and you can use this revision history and even restore an older version of the doc.
To access revision history, open a Doc and then select the "See revision history" option under the File menu. Google has more info in this support doc.
Remove Formatting
I’m sure you know that copying text from a web page or from one app to another can introduce all sorts of funky formatting problems. This can make for an ugly doc, and the problem only gets worse if you combine multiple sources.
Luckily for us, Google Docs has an option to strip the formatting from a piece of text. Simply highlight the text in question and then press Ctrl+I. (FYI: Gmail has a similar feature.)
Type with your Voice
One of the lesser known features in Google Docs is voice typing. You can use this feature to capture ideas, compose a letter, or even write the next great novel – all without touching your keyboard.
You can find voice typing under the Tools menu. Once enabled, a pop-up with a microphone icon will appear. You’ll need to click on it to speak, and once you do you can add punctuation and line breaks, and even correct typos – hands-free.
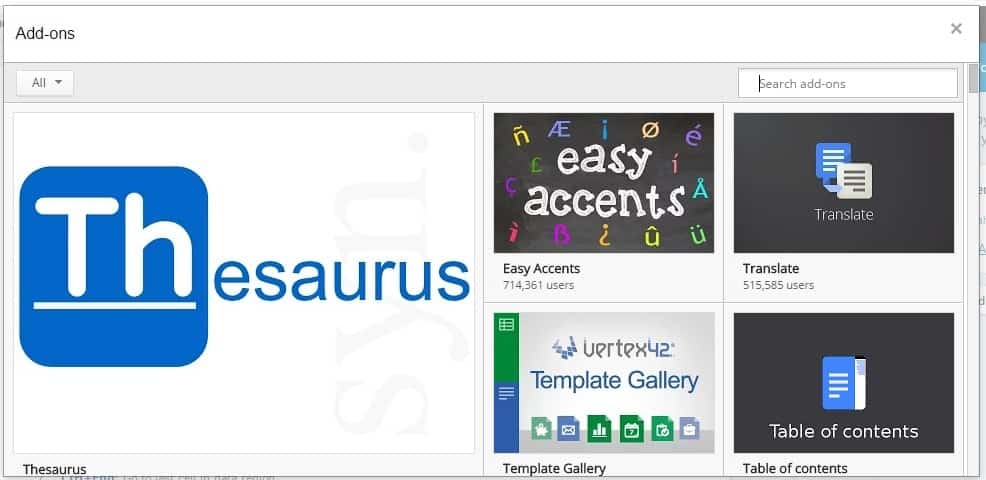
All of the tricks mentioned so far are core features of Google Docs, but they’re really just the beginning of what you can do with Google Docs.
You can expand the core abilities of Google Docs by install add-ons that add features, tools, and export options. My current favorite add-on is a consistency checker, but that is just one of the possibilities.
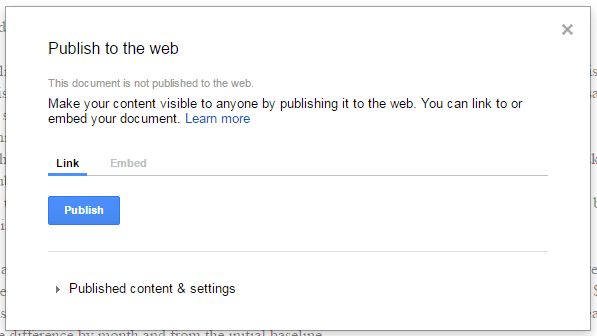
Publish to the Web
Google Docs is part of an office suite, but did you know that in a pinch it can create a website? No, really!
There’s an option in the File menu for "Publish to the Web" which lets you make a doc publicly accessible with a URL and everything. It won’t look much like a website, but if all you want is to share the info then this is a viable option for a poor man’s website.
You can even unpublish the doc when it is no longer needed.
Publish to WordPress
But why settle for simply publishing a doc as a pseudo webpage when with a little more work you can have the real thing?
There are several Google Docs add-ons which will let you export a doc as either a post or page on a WordPress site. You’ll need to install the add-on and you may also need to install Jetpack on your WordPress.org site, but once you do you should be able to export a doc as a draft page or post.
I have had the best luck with WordPress for Google Docs, but that add-on doesn’t work for everyone. Luckily there are several other options.
Offline editing
You might think that Google Docs only works online, but you would be wrong. There’s an offline editing mode which lets you access and edit your documents even when you have no internet connection, and then sync the changes when you’re next online.
There’s a catch, though. You have to set this up before you lose internet access.
Amazon’s Kindle is a great reading platform with a number of useful annotation features, but sometimes it’s not enough.
I recently updated my four-year-old post on Kindle annotation tools, and I realized it was time to do this post as well. Much has changed in the past couple years since this post was first published; Amazon has added new features to the Kindle platform and some of the tools I found then are no longer supported by their developers (in fact, one or two tools in this post were simply abandoned and had their domains snapped up by gay porn sites).
That older post focused heavily on Amazon tools like the email export features in the Kindle apps for iOS and Android (which are now available on the Kindle and Kindle Fire). This post covers just non-Amazon tools you can use to manage your Kindle clippings.
There are a wide variety of tools out there, including some as simple as the one that converts your myclippings text file into a CSV. (That sounds strange, I know, but if you use spreadsheets a lot then this would be a great first step.)
Microsoft’s note-taking app has a tool where you can clip a webpage and import it into a notebook. Evernote has a similar tool, and you can use them to snag your notes and highlights by going to kindle.amazon.com/your_highlights and clipping the page.
To be honest, I don’t find either tool very useful; they grab the whole page rather than the key parts. A more focused tool would be better.
K2E is a Chrome app that will automatically upload your Kindle Notes and highlights to Evernote.It costs $1 a month. I don’t think it’s worth it, but (to name one example) I can see how an author might want to use this type of automation with their beta readers. This tool has not been updated since 2015.
This tool is installed as a bookmarklet, and you use it by clicking the bookmarklet while visiting the book’s page on read.amazon.com.
Bookcision will reformat the page so you have a cleaner view of your notes, and you can then copy them to notepad (Chrome users can also download them).
And if you are using macOS, you (might) have an alternative: Notescraper.
Everyone knows that calibre is an ebook conversion and library management app, but sometimes some of its features are overlooked. For example, it can manage the ebooks on your Kindle – and it can also collect and organize your annotations.
This is an open source software package that helps you import your Kindle’s “My Clippings.txt” into other programs. The system can be customized to output files in a wide variety of formats. This tool has not been updated since 2014.
Kindle Mate is a neat tool with rich features designed to sync, organize, import & export Kindle clippings (Kindle highlights and notes) and Kindle Vocabulary Builder words on your computer. This tool has not been updated since 2017.
This macOS-only app lets you import your notes from a myclippings file or from Kindle.Amazon.com. Once you have them you can manage them in the app, or export them in Evernote or Markdown formats. You can also use the app to open Kindle for macOS and read the note or highlight in the ebook it came from.
This web-based service can integrate with your Kindle account and automatically import your notes (via a $2 Chrome extension). You can also automatically import the notes from your Kindle, or the the Kindle apps for iOS and Android.
Once you have the notes you can share them online, or export them in a variety of file formats. You can even automatically export them to Evernote.
This service (which I first found as a Chrome extension) is a general purpose note and highlight manager. It can import your Kindle notes, but it also has extensions for all the major (as well as Safari). You can use those extensions to clip web content and essentially make an online notebook.
This is another annotation management tool. It just crossed my desk this evening, but I am told by its developer that Readwise uses a browser extension to automatically download your Kindle highlights from the cloud. It also works with Apple Books, Instapaper, Highly, and Medium (for articles), and other platforms.
Fonts are cool, and they are probably the biggest reason that this blogger envies authors. Authors are free to embed fonts in their ebooks or use them in the layout of a print book, while I, on the other hand, publish to the web, which means I can (or at least I should) only use the fonts that I know are on most web browsers (these are called “web-safe fonts”).
The closest I can come to using a decorative font is creating a banner and then adding the image to a site’s design, and that has me gnashing my teeth because I won’t much fun with the fonts I am going to share with you today.
I was reading a post on The Book Designer this morning, and it got me thinking about fonts. Joel shared a PDF showing 110 decorative font characters that authors could use in their next book.
That was a pretty cool PDF, but do you know what would be even cooler? A ZIP file with fonts you could use in your next ebook.
The file contains 33 fonts, totaling about 500 characters you can use in your next book.
I checked, and all of the font files in the ZIP are legal for both for personal and commercial use. That means you can put them in the ebook you sell at Kobo, Apple Books, and other ebookstores. That is an important detail because, as we learned in Cockygate, if you don’t have a commercial license, you cannot use the font in anything you sell.
There is a small amount of redundancy; one developer, for example, created three different fonts just for flowers. (I think greater selection in a specific niche can be good.)
So tell me, which one do you like the most?
P.S. please let me know what you make with these fonts; I would really like to see it!
KDP (Kindle Direct Publishing) is widely seen as a self-publishing portal. This is funny both because publishers use it to manage their titles in the Kindle Store, and also because there is actually very little in the way of author tools in KDP – it is strictly a publishing portal.
Amazon does have an author portal called Author Central. This is where authors can upload their head shot, bio, and other details for their author page on Amazon.com. They can also use it to track the Amazon sales rank for their books.
Note: In December 2017 Amazon started beta-testing a new portal called Amazon Author. It is still in a closed beta test, so far as I know. I still don’t have access, and in fact most authors haven’t even heard of it. I will update this post if and when the new portal is opened to the public.
I recently set up my profile on Author Central, and here’s how you can set up yours.
The first thing you need to do is gather your materials, including:
your head shot, and other photos you want to share
Once you have everything, go to https://authorcentral.amazon.com. If you have already visited Author Central and created an account, log in. (Skip the next couple paragraphs, and the image.)
If you are visiting for the first time, click the "Join Now" button found on the right side of the page on Author Central. Amazon will take you through a few steps, including accepting the TOS and claiming the books you have listed on Amazon.com, etc. Once you have finished the steps, you should see a page with a "Welcome to Author Central" message.
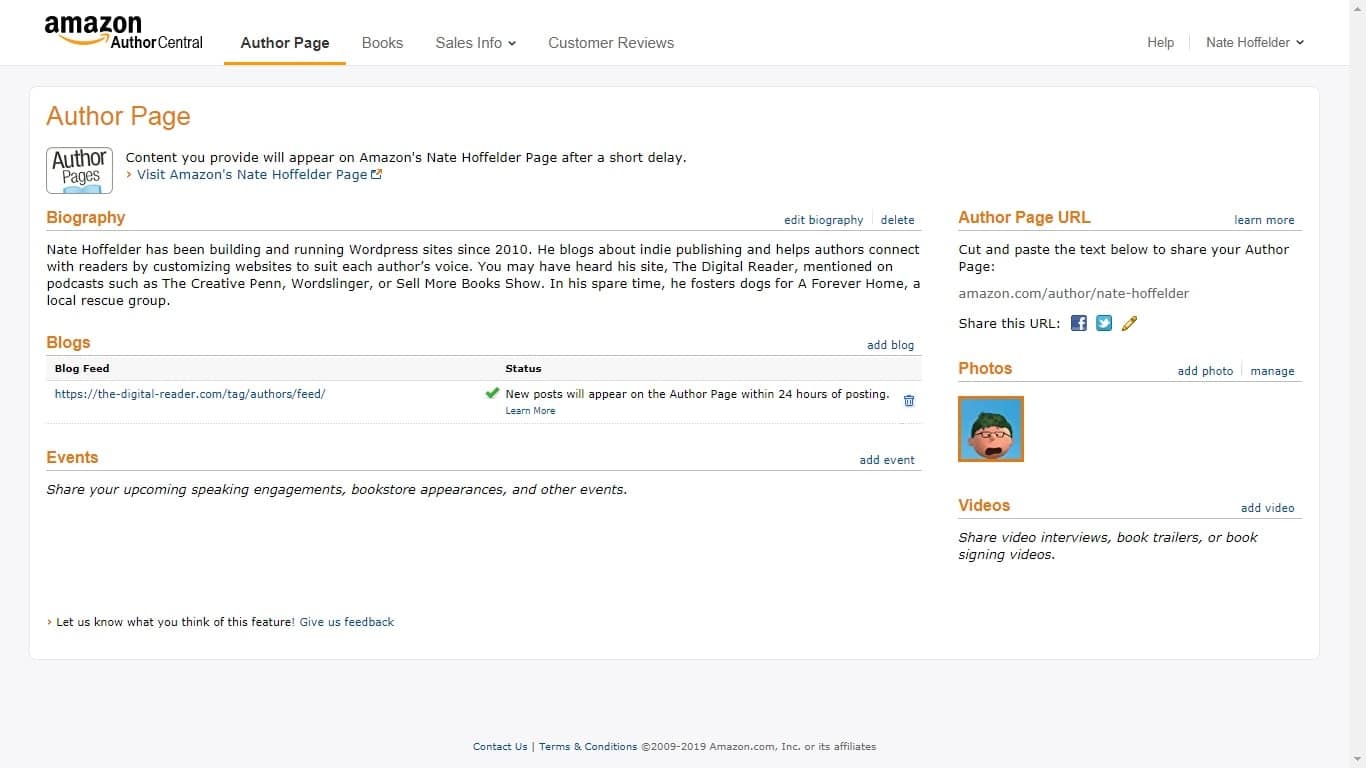
Click on the "Author Page" option, and you should see a page that looks like this (only not filled it):
This is the page where you will upload your your photos and videos, link to your blog’s RSS feed, and list any public events.
At a minimum you should add a biography and a head shot, and then go to the "Books" page and make sure you have claimed all of your books that are listed on Amazon.com, because Amazon is going to take the information you provide and publish it on your author page on Amazon.com.
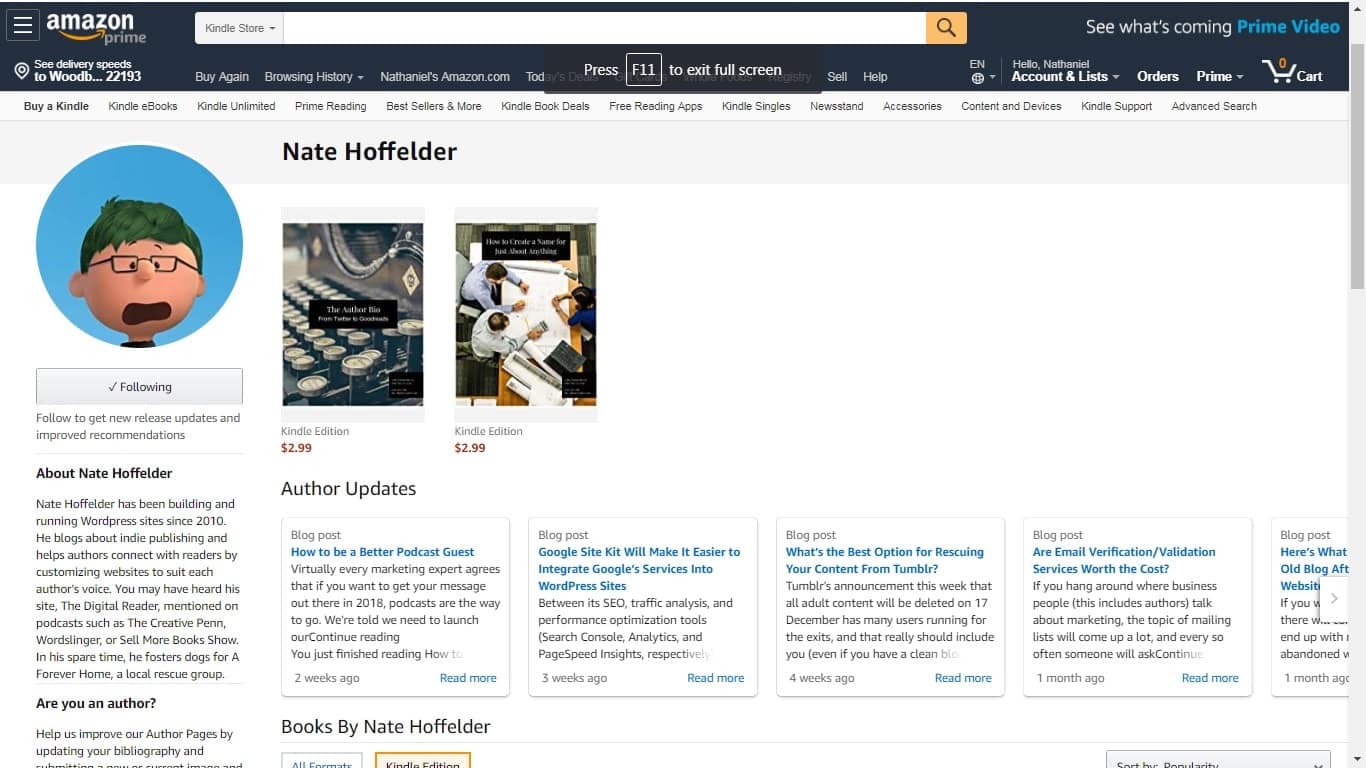
Mine looks like this. I uploaded two of my workbooks to KDP. I don’t really expect to sell any; I just did it so I could set up an account on Author Central and see how it worked.
Between its SEO, traffic analysis, and performance optimization tools (Search Console, Analytics, and PageSpeed Insights, respectively), Google supplies a number of key tools used by just about everyone who has a website.
Unfortunately, it can be hard for the non-tech-savvy to use these tools with their site. This is good for me but not so good for the average user, but now Google is trying to solve this issue.
I just heard in one of the Facebook groups where tech gather than Google is testing a new WordPress plugin that is designed to integrate Google’s services into self-hosted WordPress sites.
The plugin will open to beta testers in early 2019, so we really don’t know anything about how well it works.
But I can tell you it is supposed to do is integrate four Google services into WordPress, making it easy for users quickly access info about their sites. Users will be able to look into Google Search Console and find out which keywords are drawing the most users to the site, check Google Adsense to see how much they are earning from adverts, examine their popular posts and traffic sources in Google Analytics, and see what Google PageSpeed Insights thinks about the speed of their sites.
These four different services can currently be found on four different websites, but after Google works the bugs out of Site Kit, WordPress users will have all this info at their fingertips.
If that sounds nifty, head over to the Site Kit to sign up for the beta. I did. I don’t know that I will be installing this plugin on any of my clients' sites, but I am curious to see what this looks like.
TBH I have pretty low expectations; Google has recently redesigned the Search Console and PageSpeed Insights websites to make them both more confusing and less useful (no, you didn’t read that wrong) and I fully expect that Google’s new plugin to be very bewildering for the average user.
And that is unfortunate because it would actually be pretty useful if Google would automate the steps required to integrate their services into WordPress. Yes, this integration would cost me a little business, but if it worked well then I can save time by using it on client sites.
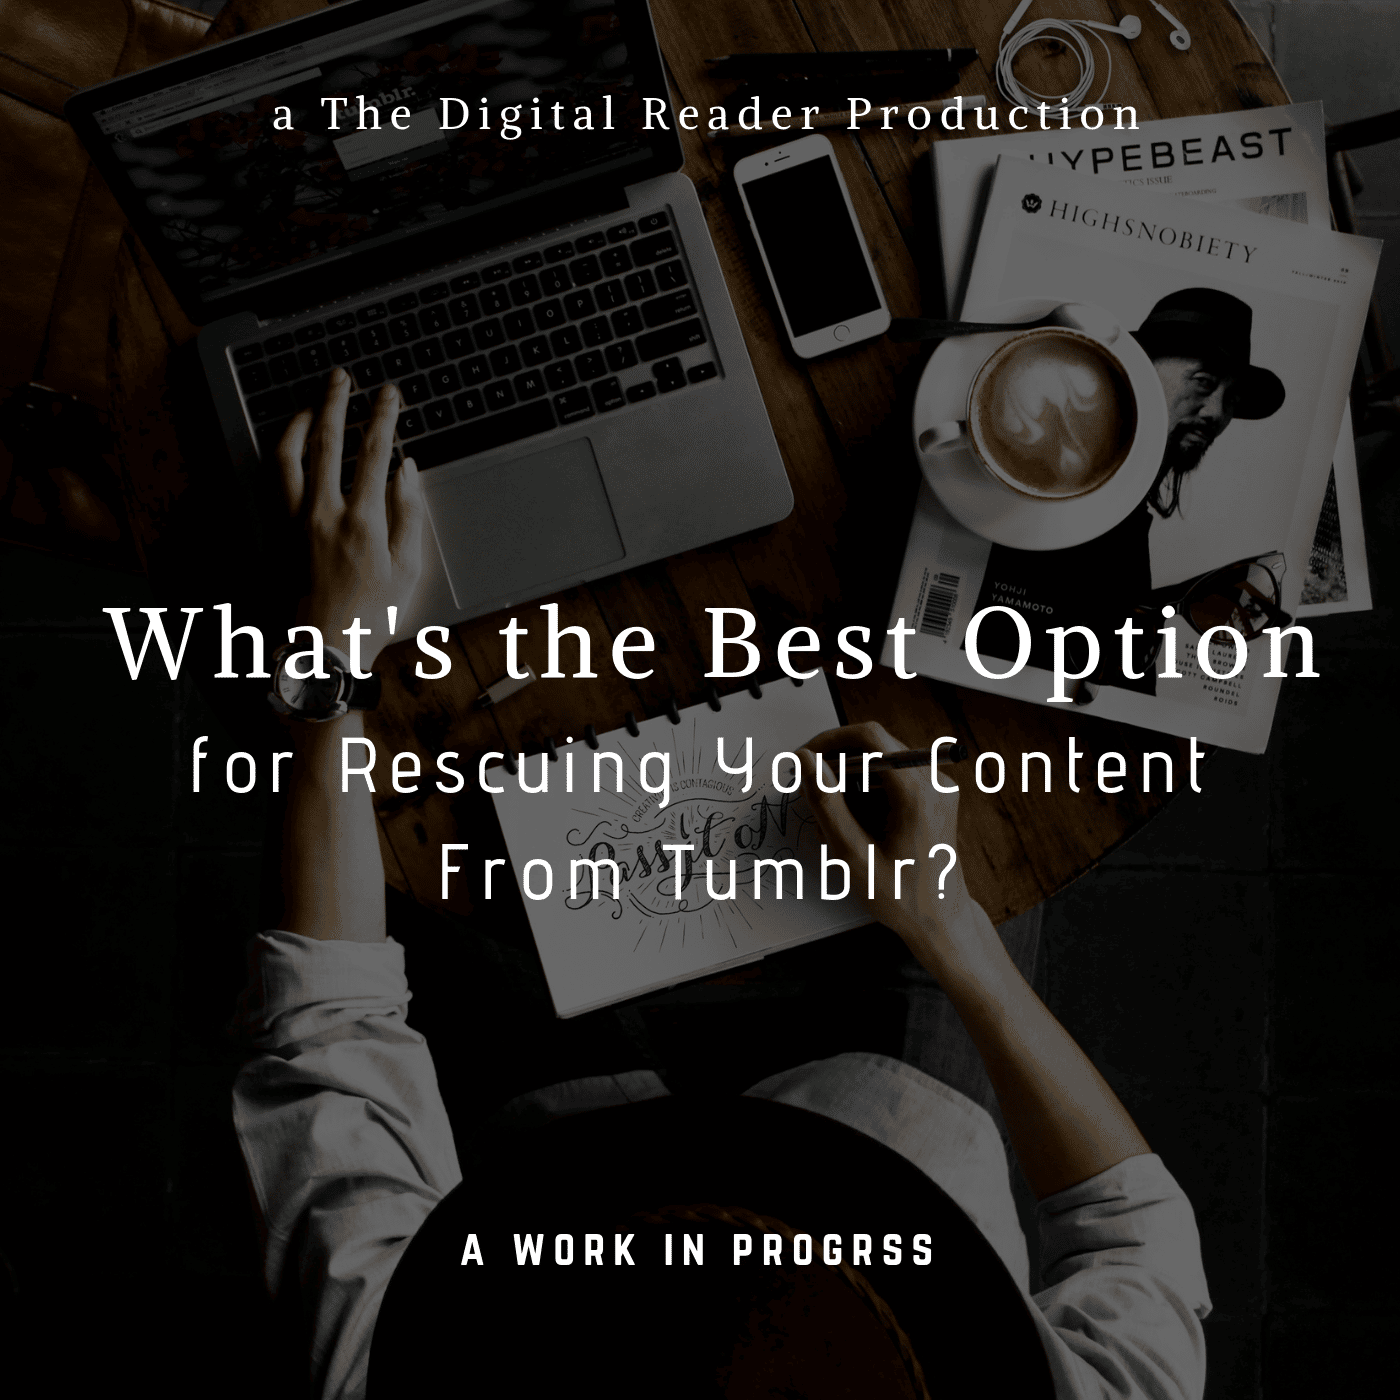
Tumblr’s announcement this week that all adult content will be deleted on 17 December has many users running for the exits, and that really should include you (even if you have a clean blog on Tumblr). While the intent was to ban NSFW content, the scary thing about Tumblr’s decision is that they are using bots to censor content, and the bots have already proven to be completely (nay, hilariously) inept at identifying adult content.
Many innocent users are going to be burned by the new policy, and it would be a good idea to anticipate the problems Tumblr is going to cause. That’s what I am going to do with my blog on Tumblr.
Earlier this evening I rediscovered an old forgotten humor blog I had on Tumblr. It’s not great literature, but I am rather fond of some of the jokes I posted, and I’d prefer not to lose them.
And so I decided to investigate my options for saving my posts from Tumblr’s inept bots. Here’s what I have learned.
Broadly speaking, I have two options. I can download an archive of my content, or I can automatically transfer the content to a WordPress blog (there are other perfectly good platforms, but I deal in WP so that is my main focus).
I can set up a new WP site and move the content there, or I can add the content as posts on an existing WP blog, or I can set up a second blog on an existing WP site and move the posts there, but generally speaking the process for moving Tumblr posts to WordPress works the same way for all three choices.
The process of moving Tumblr posts to WordPress involves using one of the WordPress import features to automatically transfer the content from the Tumblr site to the WordPress site. You have two options, one that is built to work with Tumblr and another that will work with just about any RSS feed.
They work equally well, but I don’t think you should choose either option.
The thing is, last night I tried automatically moving a few of my Tumblr posts to my humor blog, The Oyster Pail, I did get the content moved successfully, but the resulting posts just look unacceptably ugly. The automated settings turned posts with big, bold images into anemic pathetic posts.
Just to give you a better idea what I mean, here’s a before and after example.
I am going to have to go in and fix each post one at a time, and that kinda defeats the goal of automatically moving it. I wanted to save time, and the automatic process can’t do that.
So since I have to spend time on this, clearly the best option is to download an archive of my content so I can repost the content at my leisure. This archive (if I ever manage to download it) is supposed to arrive in a ZIP file with html pages and images. If and when I get it I can either set this up as its own static site, or I can browse the posts one page at a time using a web browser, and then repost each post one at a time.
I don’t have that archive yet (and I’ve been waiting almost a day) but I do think this is the best option. It’s the one I will be recommending to all my clients.
If you need more info, Tumblr has instructions on how to export a blog from their service.
Edit: It took 48 hours, but I finally got that archive. Reposting this as a static site is going to take a fair amount of work in building the index.
If you hang around where business people (this includes authors) talk about marketing, the topic of mailing lists will come up a lot, and every so often someone will ask about email verification services. These are companies that, if you upload a list of email addresses, will tell you which emails are valid, junk, dead, etc.
Most charge for this service, raising the question of whether putting your mailing list through is worth the expense.
I’ve just used one of these services, and I can tell you that the answer is a very firm "it depends".
No, seriously, this type of service is only useful in certain situations, and almost all other cases it is a waste of money. For example, it is a good way to clean junk email addresses before you add them to your mailing list, but it is of little use for an active list that you are already sending emails to.
Let me explain how I found that out.
I am in the middle of relaunching this blog for its ninth anniversary, and one of the things I am doing is revamping my mailing list with a new design, schedule, etc. I am actually using two services to deliver my blog posts by email, Feedburner and Mailchimp, and I want to drop one.
I’d been wanting to get rid of Feedburner for a while now because it is lacking in features and no longer supported by Google. (There are in fact a whole host of reasons to leave Feedburner, as Jane Friedman explains in detail.) But before I leave Feedburner, I need to make sure that it is worth the effort to move the email addresses. Feedburner doesn’t offer any type of analytics, so I really do not know whether any of the emails were valid, junk, or dead. This is an important details because it’s not worth moving dead or junk email addresses. (Also, email services like Mailchimp will ding you if you import a list with a high percentage of bad email addresses.)
And so I turned to QEV, an email verification service I had previously tested. They will check up to 100 email addresses a day for free, but that’s just not a high enough volume, so I signed up for a monthly plan that would let me check up to 500 emails per day (I’m going to cancel as soon as this project is done).
Over the past few days I have been feeding my Feedburner list into QEV, and once that was done I grabbed a random 500 different email addresses from my list on Mailchimp and fed that in as well.
Now, when you use a service like QEV, they’re going to tell you that an email address falls into one of four groups. The groups will vary between one email verification service and the next, but for QEV they include:
Safe to send – These are the email addresses that QEV knows belong to real people. This group will often come back from QEV with real names and mailing addresses attached.
Valid – According to QEV, this group of emails should work but that is all they can say.
Invalid – These are the email addresses that QEV believes lead to dead inboxes because technical tests showed there was no mailserver to receive the email.
Unknown – Email addresses in this group might be valid, or they might not. QEV can’t tell for sure, so they don’t charge a fee.
QEV advises that you only use the "safe to send" group because that is the one that is most likely to end up in front of a real person. If I were using this list for marketing, I would likely follow their advice because that’s the group most likely to buy something. But since these email addresses belong to people who were my readers more than potential customers, I decided it was better to keep all valid email addresses.
Here’s what I found when I ran my tests:
The vast majority (98%) of the list from Mailchimp was made up of valid email addresses. The rest were unknown, which in this case probably means that the email addresses are valid even though QEV can’t say for sure.
The Feedburner list, on the other hand, wasn’t nearly as clean. Over 16% of the emails in my Feedburner list tested as either invalid or unknown.
Mailchimp had already been cleaning my list as I was sending out emails,. They had removed email addresses whenever an email bounced or was rejected, so there was little reason for me to spend any time or money checking the rest of the emails from Mailchimp.
Feedburner, on the other hand, did not bother with cleaning the list, so I really should do that when I move the list from Feedburner.
What this has taught me is that a service like QEV has value in inverse proportion to the quality of my list. Reputable email companies like Mailchimp already clean your list, so there’s little reason to pay QEV to do it. (On the other hand, QEV can tell you more about your subscribers, and that might be worth it.) Email addresses bought from lead generation services or scraped from the web have no guarantee of quality, so you should run them through a service like QEV.
Really, though, the only way to know if your list is high-quality is to test a sample, and check the results.
Luckily, most email verification services like QEV will let you test a limited number of email addresses for free.